Category Archives: homemade

DIY AFTER SUN LOTION

I have found the best solution to take care of my skin after spending summer days in the sun.  It’s so simple and my skin has never felt so good!
 
Ok, between you and me, I got burned kinda bad a few weeks ago.  In fact, I can’t remember if I’ve EVER been burned so bad.  EVER.  For the past few years I have only used natural sun screens for me and my family, but this particular day I used one with chemicals… AND I FRIED!  I assure you that I am back to using the natural stuff!  Find out HERE why I switched in the first place.
Any who, this DIY lotion worked better than anything I have ever used, ever!  I applied it at least 4 times a day for the first 3 days.  
1.  It seriously soothed the burn.  2.  After a few days, my daughter and I both realized that my skin was super SOFT!  She asked what I was using and asked me to make her some!   3.  And finally, my peeling and itching was minimized.  
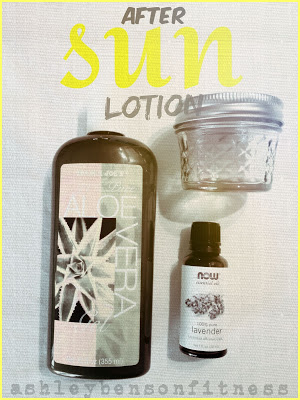
So from now on we use this:
You should make this!
Now go enjoy the 
SUMMER!!!
 
* Thank you SWANSONVITAMINS.COM for providing the wonderful, natural products for this blog series!!!  Go check out this great company for your supplies.  They have the best prices I know!!!  Click HERE to get a $5 coupon to Swansons!!!  Go get you a FREE essential oil!


DIY LAVENDER DRYER BALLS

First, I can’t believe how easy this dryer sheet switch is.  Oh, and if you aren’t sure if it’s a big deal to replace what you are use to, read 10 TOXINS LURKING IN YOUR FABRIC SOFTENER 
Now there are a few different options here:  Felted Wool Dryer Balls (I read that they come apart in the dryer) or aluminum foil dryer balls (I’ve read mixed reviews and I REALLY want my laundry to smell good!) so I choose to go THE SOCK rout.  I first saw this idea on the CampWander blog.  I took Rebecca’s advice on the first load and choose to use my Lavender Essential Oil.  The first test: our bedroom sheets.  I have to say that I am pleasantly surprised with the results!  My sheets are clean, soft, and smell delightful.  I hear that each ball will last 10-15 loads, depending on the brand of the oil you use.  I’ll give you my report in a few more laundry days.  

So now it’s your turn!  

 WHAT YOU NEED:
AND
DO THIS:
I want to know what you think! 
Try it out and then come leave a comment.
For now, I’m going to curl up in my freshly cleaned sheets 🙂
Goodnight!

DIY TOILET CLEANER

Today we are cleaning our toilets with out any chemicals!  Oh fun!!!  LOL
And they will be CLEAN! Are you ready?
 
1. Pour 1 cup of Baking Soda into the jar. 
2. Then add 1 cup vinegar.
Remember that there will be somewhat of a science experiment during this step.  This captured the attention of my 7 year old, who asked, “Can I pour it?”  
And then…
However, this was so funny to Iver… 
and now he was fully invested in my project! 
3.  Add your essential oil.  
4. Shake it up.  
5.  Pour it in the toilet bowl and scrub.
So about THIS picture… 
I was cleaning the outside of the bowl before I let Iver scrub the inside (he actually asked if he could clean it!!!… that’s NEVER happened before… ever!)  So as I was wiping it down, I had the normal noise and movement that IS my son behind me.  But when I turned around, I found Iver using the toilet brush as a light saber fighting off who knows what in the bathroom!!!  EEEEEEEK!!!  I’m just SO glad it was a bran new brush that had never seen the inside of a toilet yet!  
And then I made him pose for a picture 🙂  
And then HE happily cleaned the toilet! 
hehehehehe
 
Well, I hope you have as much fun and adventure that I had when it’s time to clean your potty!
 
HAPPY HEALTHY CLEANING!
* Thank you SWANSONVITAMINS.COM for providing the wonderful, natural products for this blog series!!!  Go check out this great company for your supplies.  They have the best prices I know!!! Click HERE to get a $5 coupon to Swansons!!!  Go get you a FREE essential oil!
 

DIY GLASS/MIRROR CLEANER

WHAT YOU NEED
1 cup white vinegar
1 cup water
8 drops of a citrus essential oil –
 lemon, orange, grapefruit, or lime
spray bottle – glass is best


Add all the ingredients to a spray bottle using a funnel.  Shake well before using.  Spray onto glass or mirror and then wipe with a dry cloth or towel.
Clean your faucets with this as well!  
Use in the bathroom and it will prevent your mirrors from fogging up 🙂

* Thank you SWANSONVITAMINS.COM for providing the wonderful, natural products for this blog series!!!  Go check out this great company for your supplies.  They have the best prices I know!!! Click HERE to get a $5 coupon to Swansons!!!  Go get you a FREE essential oil!


HAPPY HEALTY CLEANING!

DIY DUSTING SPRAY

Shake it up often because the oils separate. 
That’s all I’ve got to say about that.
Oh, and glass jars are better than plastic.
Now go make it!!!
* Thank you SWANSONVITAMINS.COM for providing the wonderful, natural products for this blog series!!!  Go check out this great company for your supplies.  They have the best prices I know!!! Click HERE to get a $5 coupon to Swansons!!!  Go get you a FREE essential oil!
 
 
HAPPY HEALTHY CLEANING!

DIY OVEN CLEANER

CONFESSION  
Cleaning my oven is not something I do often ever.  It’s not a place I think to clean.  
-Maybe I would if THIS were my oven though-

As I was searching for the best and most practical – meaning easy-  homemade house cleaners for me to use in my home, I came across this chemical-free OVEN cleaner on a website called YumUniverse.com  I really love the recipe that Heather has and I’m going to adopt it as my own oven cleaner!


TOOLS YOU NEED

paintbrush (like a pastry brush)
2 medium glass bowels
scrubber sponge
spoon

INGREDIENTS 

1/2 cup of liquid soap 
1 1/2 cup baking soda
2-4 drops of essential oil of your choice
1/4 cup white vinegar
water as needed to make thick paste

NOW CLEAN

1. Remove racks- clean them separately in the sink.
2. Add all ingredients into a bowl and mix well.  You will want a thick paste.
3. Paint the paste over the entire surface of the inside of the oven.
4. Let is sit for 6-8 hours (over night maybe???)
5. Fill bowl with clean water and use it with the sponge to wipe off the surface.  You may need to get clean water a few times.

 
Heather has a great step-by-step tutorial with pictures showing us how to do this.  Take a look HERE.  Thanks Heather for sharing!

Ok, so I want to know who is going to go clean their oven now?  I think I will paint on the cleaner on Sunday evening, let it do its thing all night and then wipe it down Monday morning.  A clean oven for the start of a new week might just inspire me to use it next week!  LOL  We shall see!


* Thank you SWANSONVITAMINS.COM for providing the wonderful, natural products for this blog series!!!  Go check out this great company for your supplies.  They have the best prices I know!!! Click HERE to get a $5 coupon to Swansons!!!  Go get you a FREE essential oil!

DIY Foam Hand Soap!

I USED
Liquid Soap (Dr. Bronner’s)
Empty foam soap bottle
Essential Oils
Water
Optional:
to make the soap moisturize, add 1/2 tsp of Vitamin E oil, Almond oil, or vegetable glycerin
Step 1       Fill soap about 1/4 of the bottle
Step 2       Put 10-20 drops essential oil – I used Tea Tree Oil and Lavender Oil
Step 3       Fill the rest of the way with distilled water
And DONE!
Oh, thank you for asking.  
The structure in the background of my picture is the home of our 
lovely little chicks!  
In a few months we will have lots of 
lovely little organic, free-range EGGS!
Thank you Girls!!!
   HAVE A HAPPY HEALTHY DAY!

DIY MICROWAVE CLEANER

I’m sure you are very busy today, 
so I will keep this short and sweet:
1. Fill a microwave safe bowl full of white vinegar and 15 drops of tea tree essential oil (or another oil you choose).  
2. Heat for about 2 minutes.  There will be steam.  
3. Wait about 3 minutes and then wipe down the walls with a clean cloth or sponge.  Be careful not to burn yourself with the hot vinegar bowl when taking it out.  

The end.  
Easy to do while you are washing out our dinner dishes tonight!

* Thank you SWANSONVITAMINS.COM for providing the wonderful, natural products for this blog series!!!  Go check out this great company for your supplies.  They have the best prices I know!!! Click HERE to get a $5 coupon to Swansons!!! Go get you a FREE essential oil!


HAVE A HAPPY HEALTHY DAY!
 

DIY: CLEAN SINK

FOR A CLEAN AND SPARKLY SINK, YOU WILL NEED
1-2 drops of lemon essential oil
damp cloth or sponge
1 tsp baking soda
Sprinkle baking soda on your sink.
Add lemon oil drops to damp cloth or sponge and scrub.
Rinse thoroughly.
THIS IS ANTIBACTERIAL!!!
theTIP
Keep a jar of baking soda under the sink so that everyone can have access to it and help!  
Clean your sink before you go to bed so you can wake up to a shinny, clean sink in the morning!

* Thank you SWANSONVITAMINS.COM for providing the wonderful, natural products for this blog series!!!  Go check out this great company for your supplies.  They have the best prices I know!!! Click HERE to get a $5 coupon to Swansons!!! Go get you a FREE essential oil!

DIY ALL PURPOSE KITCHEN CLEANER

Using chemical-free, non-toxic cleaners in the kitchen is super important to me.  When I spray a cleaner on my counters and appliances, it’s likely that some of the cleaner will end up on my  food and dishes, as well as in my lungs from breathing and on my skin (because there is NO way I’m grabbing gloves every time I wipe down the counters).  So for me, this is a no brainer.

Here is the recipe I’ve been using

1 tsp baking soda
1/2 tsp liquid castille soap
2 Tbsp vinegar
8-10 drops of essential oil
distilled water
spray bottle – glass is best
funnel
  1. Pour baking soda,  liquid soap, and vinegar in a spray bottle. For a large spray bottle, double the recipe.
  2. Shake it up and then let it sit for a few minutes. 
  3. Add essential oil and fill the rest of the way with water.  
 
theTIP
The last batch I made, I added orange oil.  It smelled good, but I had it in a clear spray bottle and it was not pretty.  The orange separates at the top and does not look good to leave out.  Every time I saw it, I would shake it up to make it look better LOL.  Actually this wasn’t a bad thing, because after shaking, I couldn’t help but clean something every time 🙂 
Isn’t that easy?  Now go make some up for your kitchen.
*  Thank you SWANSONVITAMINS.COM for providing the wonderful, natural products for this blog series!!!  Go check out this great company for your supplies.  They have the best prices I know!!!

HAVE A HAPPY HEALTHY DAY!